Pages

Showing posts with label Decor. Show all posts

Swing lamps for everyone!

Tuesday, September 17, 2013

Ahh, the never ending master bedroom makeover. I have to say, I'm pretty sick of thinking about the master bedroom. I've been working on it for over a year but just get distracted so easily! I think we're finally in the home stretch though of making it feel more personalized and cozy instead of bare walls and random accessories sitting everywhere. (You can check out the previous updates here, here, here, and here).

The most recent update is new nightstand lamps. When we replaced the nightstands, it quickly became obvious that the surface space was pretty small. I decided that switching out our existing (and non-coordinating) lamps for some swing-arm lamps would be just the solution we needed. Luckily, Loren agreed. :) What neither of us could agree on was the high price of swing-arm lamps! Once I knew that was the direction we wanted to go, and I started shopping, I couldn't believe how expensive they were! I thought I'd found the best price possible on Amazon but it still would've been about $160 total which made me hesitant to complete the purchase. I stalled long enough that I was able to find a winning lamp at Home Depot. For $35! Wahoo!!


The lamp itself requires a little bit of assembly. I'm not going to lie, Loren did all the work installing these lights. But he said that it's easy, just screw the visible wall plate to the portion that actually screws into the wall, and then connect the cord covers together. We don't have any pictures because he was working by himself in a hurry before company arrived! Nothing like a visitor to get our booties in gear! 

Here's the lamps all set up! We're loving them so far! They're great for allowing extra space on the nightstand and Loren loves that he can pull the light closer to him.


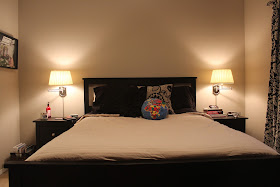
 Our nightstands still need a little styling, but Loren is definitely more into function rather than decor. I guess I'd like a mix of both. But this is where we are now, reading in a whole new light. :) Operation bedroom makeover is finally approaching the finish line. What do you think of the new lamps? Anyone else a fan of the swing-arm lamp?

A Little Bling Never Hurt Anything

Thursday, March 21, 2013

We've been making tiny bits of progress in our master bedroom makeover. Tiny being the keyword. The last update I shared with you included our new dresser and nightstands from the Hemnes line at Ikea.


We're still liking the furniture, the nightstands in particular but I decided I wanted to spiff them up a little bit. Adding new hardware seemed like an easy and reversible change so I set out to find some new drawer knobs. The knobs I ended up purchasing are from Hobby Lobby and they're sporting a little sparkle!


The price tag was just right - $3 each! Even paying $6 each wouldn't break the bank but it's so awesome that Hobby Lobby always has their hardware 50% off! The installation was quick and easy, it literally took about five minutes to install all four of the new knobs. And BAM! Sparkle!


I'm loving the extra little something that the new knobs brings to the room. It's nice to personalize the plain ol' Ikea furniture and make it our own a little bit. (Sorry for the cords in the pictures, but that's real life!) A quick before and after comparison:


Cute huh? Hope you like the little update! We've been getting little upgrades done around the house while we're in the process of pricing out some larger projects to complete over the next few months. Stay tuned! :)

Christmas Decorations

Friday, December 21, 2012

I have no idea why it takes me so long to get a post together about our Christmas decorations. It seems like every year it takes me forever! They've been up since the beginning of the month but I guess I'm slow with getting the pictures taken.

Anyway, this year I tried to keep things simple but still sparkly and pretty. I always love sparkle but I feel like you can really go at it during the holidays. I try to keep things within traditional Christmas colors: red, green, with a little silver and gold thrown in.

Let's start outside - we kept it really simple. My red sparkly wreath that I bought forever ago, a little potted pine tree, and some garland around the entry way to the porch. I added a couple red bows to the garland and to the tree and called it a day.


I think our outdoor lights are festive and Loren didn't have to break his neck trying to hang them up. Win, win!

Our entryway is where we hang our stockings, this probably looks exactly like it did last year including our personalized stockings.


I changed a few things in the dining room this year. I kept the garland on the buffet and filled the apothecary jars with red and green ornaments. I also put a couple metal "gifts" on the the other side of the buffet. I hung up some star lights that I grabbed at Ikea during our last trip. I'm undecided if they'll make a return next year or not.


The table got a new red runner with a sequin edge, and I added some sparkly decorations to our usual centerpiece. Another change I did this year, is to hang some garland on our light fixture. I'd seen it on Pinterest and thought it would make my hanging ornaments look better. I just used some cheap-o garland from JoAnn's and put a few little decorative things around it.


I like the garland but think next year I'll replace it with some that's a little more full.

The kitchen is the same as last year with the addition of two cute little glitter trees and my DIY holiday card display. The trees I found at JoAnn's on super sale, and they just barely fit on top of our cabinets. I really like the extra sparkle up there though so I'm glad they worked out. Just a side note, they're actually hinged so they fold up completely flat! So easy to pack away after the holidays!


The living room might actually have less decorations compared to previous years but I'm enjoying the look. I switched up the decor on the media center; this year we have garland and these cute red lanterns I bought at Target last year after Christmas.


We didn't put lights in the garland because Loren said it would glare off the TV and drive me nuts but I think next year I'm going to try it anyways. I think garland just needs to shine! I did use those fake candles in the lanterns though just to make sure we didn't burn the TV. I really love our TV. :)


Our tree is the same one from last year just with a few new ornaments. I love it. I turn it on as soon as I walk in the door. It's definitely smile inducing.


So that wraps up our Christmas house tour, I hope you liked it! Please leave a link to your Christmas decorations in the comment section, I'd love to scope out ideas for next year!

The Longest Project Ever

Monday, December 3, 2012

This was truly the longest project I've ever worked on for our home. It started earlier this year when I decided to make some wall art for the guest bedroom. I had seen a few projects on Pinterest that involved using a doormat as a stencil so I thought I'd give that a whirl. I picked up my supplies at Lowe's (a rubber doormat, white spray paint, and the wood boards) and got to work. I started by spray painting the boards with some oil-rubbed bronze spray that I already had on hand.


After that paint was dry, I put the doormat down and sprayed the white paint over top.


I think this where things went downhill. The doormat was much bigger than our wood pieces so it didn't create a good border and the white paint got underneath the mat. The lines were all fuzzy and in general, the look just didn't turn out as I had hoped it would.


Since plan A didn't work out, it was time to think about plan B. After pouting and thinking about it for awhile (and by awhile, I'd say it was about six months) I decided to try using an actually stencil. I repainted the all the boards a nice clean white and then got the stencil out. I just picked up the stencil at Michael's, it's nothing fancy or special ordered.


After the stencil was taped in place, I started painting. I used three different colors of cheapie acrylic craft paint and used a foam "brush". I don't seem to have a picture of the tool I used but it was more of a "dabber". It helped keep the paint from seeping under the circles on the stencil. I adjusted the stencil on each of the boards so all three are slightly different.


Once the painting was done I wrapped the edges in a brown satin ribbon using my hot glue gun (a little trick I learned from my sister-in-law). Then I was finally done, and it was time to hang them up.


So that's the end of the journey with this little project. I'm still undecided on if I really love them or not, but they're working for now and helping take some of the echo out of the guest bedroom. We'll see how long they stay. :) Anyone else been working on a super long drawn out project? I hope I'm not the only one!

Pinterest Challenge - Fall Edition!

Tuesday, October 30, 2012

It's Pinterest Challenge time! Yay! Nothing like a challenge to get your blogging booty in gear. If you haven't heard of the Pinterest Challenge it's a fun little virtual challenge that's the brain child of Katie Bower of Bower Power and Sherri Petersik from Young House Love. Every season they challenge people to stop pinning, and start doing and get a couple other bloggers to participate with them, this time Sarah from Ugly Duckling House and Carmel from Our Fifth House are playing along. It's a fun way to get people moving! And it's lots of fun to see all the projects people share.


I worked on a couple Fall themed projects from Pinterest but really this pumpkin tower is the only one that worked out well enough to be worth talking about. I still struggling with a yarn mess from another project! :) I saw a couple cute pumpkin towers on Pinterest that I liked:


Source: www.bhg.com via Kristen @ LoveK on Pinterest

The "welcome" version seemed too big for our porch, as well as being too large to store easily. And I wanted to be able to display the pumpkins for the entire Fall season instead of it being Halloween specific so I decided to modify the smaller of the two towers to meet my needs. I'll be honest, this wasn't the cheapest project ever. I think it was around $50 total but I figure since it's something I can use for years to come it's not so bad. I got the pumpkins and leaves at Michael's and the rest of the supplies from Hobby Lobby.

First thing, was painting the terracotta pot that I used as the base of the tower. I just used a high gloss black spray paint. It took several coats to completely cover the orange but that's no biggy.  I used the styrofoam pieces to create a base for the pumpkins to stick to.I just hot glued the pieces together. I decided not to glue the foam to the pot, no real reason I just decided against it. I did shove some plastic bags around the base just to keep the foam stable in the pot. I don't have a picture because it was impossible to see anything other than the top layer of styrofoam.


 The hot gluing continued with the pumpkins. I cut the stems off the bottom two pumpkins and just hot glued them on top of each other.


Then I just put lots and lots of hot glue on the bottom of the pumpkins and stuck the whole thing to the styrofoam.


 After the pumpkins were glued into place, it was time to add some leaves around the base. This is a random note, but these leaves I bought from Michael's smell horrible. I can't even describe the smell but gosh, they were gross. Anyway, I snipped the leaves off into smaller little pieces and just hot glued them around the base of the pumpkins. They covered up the styrofoam that was showing and added a little fluff to the tower.


I placed the tower out on our front porch in place of the plant that was dying, and I think it looks really cute out there!

I love that the porch is decorated for Fall but I won't have to do any decoration switching when Halloween was over. These decorations can take us through Thanksgiving! That's a win in my book! :) Overall this was an easy project to complete. I hope you like it! Make sure you check out the other Pinterest Challenge projects that are linked up on Bower Power, Young House Love, The Ugly Duckling House, and Our Fifth House

Photo Wall - Finally!!

Wednesday, May 2, 2012

I have wanted to add a photo wall to our house for a long time. A really long time. But I could never figure out where the best spot was. Finally, I couldn't take it anymore and settled on using the hallway upstairs. Obviously the hallway is a good spot, but it's not a high traffic area so I was a little bummed that not many people would see it but decided it was worth it to move forward. Here's the hallway before we got started (well, I'd removed one picture frame already).


I'd found this inspiration picture via Martha Stewart and decided to go with that idea. I knew that Loren would appreciate the somewhat symmetrical design and since I'd need his help with all the hanging him liking the idea is good. :) I picked up a bunch of frames from Michael's, just cheapies made even cheaper with my 20% off purchase coupon! I got the pictures in and started arranging the frames out on the floor.


I tried a couple different patterns but in the end we went with the second layout. There are no pictures of us hanging the frames because well it was tricky. There might have been swear words involved. And minor temper tantrums. And finally Loren just told me to go sit down and he finished all the hanging on his own. He is a good husband. It took a few hours to get them all hung but in the end it was worth it!


It took a little bit of time to get used to but now I love all the pictures! It's so fun to look at them all and see so many nice memories. And the way the frames are hung it's really easy to take the frames down so I can switch out the pictures often which is lovely! So, that's the photo wall adventure. Anyone else have a photo wall they love? I'm sort of itching to put another gallery up somewhere so I'll have to put my thinking cap on.
 
template design by Studio Mommy (© copyright 2015)